Photobucket Photobucket Photobucket Photobucket Photobucket Photobucket

Saturday, February 26, 2011

Wallace and Gromit


Last night for movie night we watched 2 of the 3 adventures of Wallace and Gromit on Netflix. At first, the kids didn't really like Wallace and Gromit. They love Chicken Run but didn't realize they're made with the same stuff, clay! They had to adjust to the quirkiness and small amounts of dialog too which is a little different from the rest of the fast past animated type films they normally watch. I didn't realize W & G are obsessed with cheese until last night.

After the kiddos watched the third adventure today they decided they wanted cheese and crackers, just like they do in the movie. Sliced cheese. Last night S, before he watched the movie, insisted he did not want sliced cheese on his sandwich but shredded! Go figure! The power of media? Pickyness gone away with imagination? Who knows.

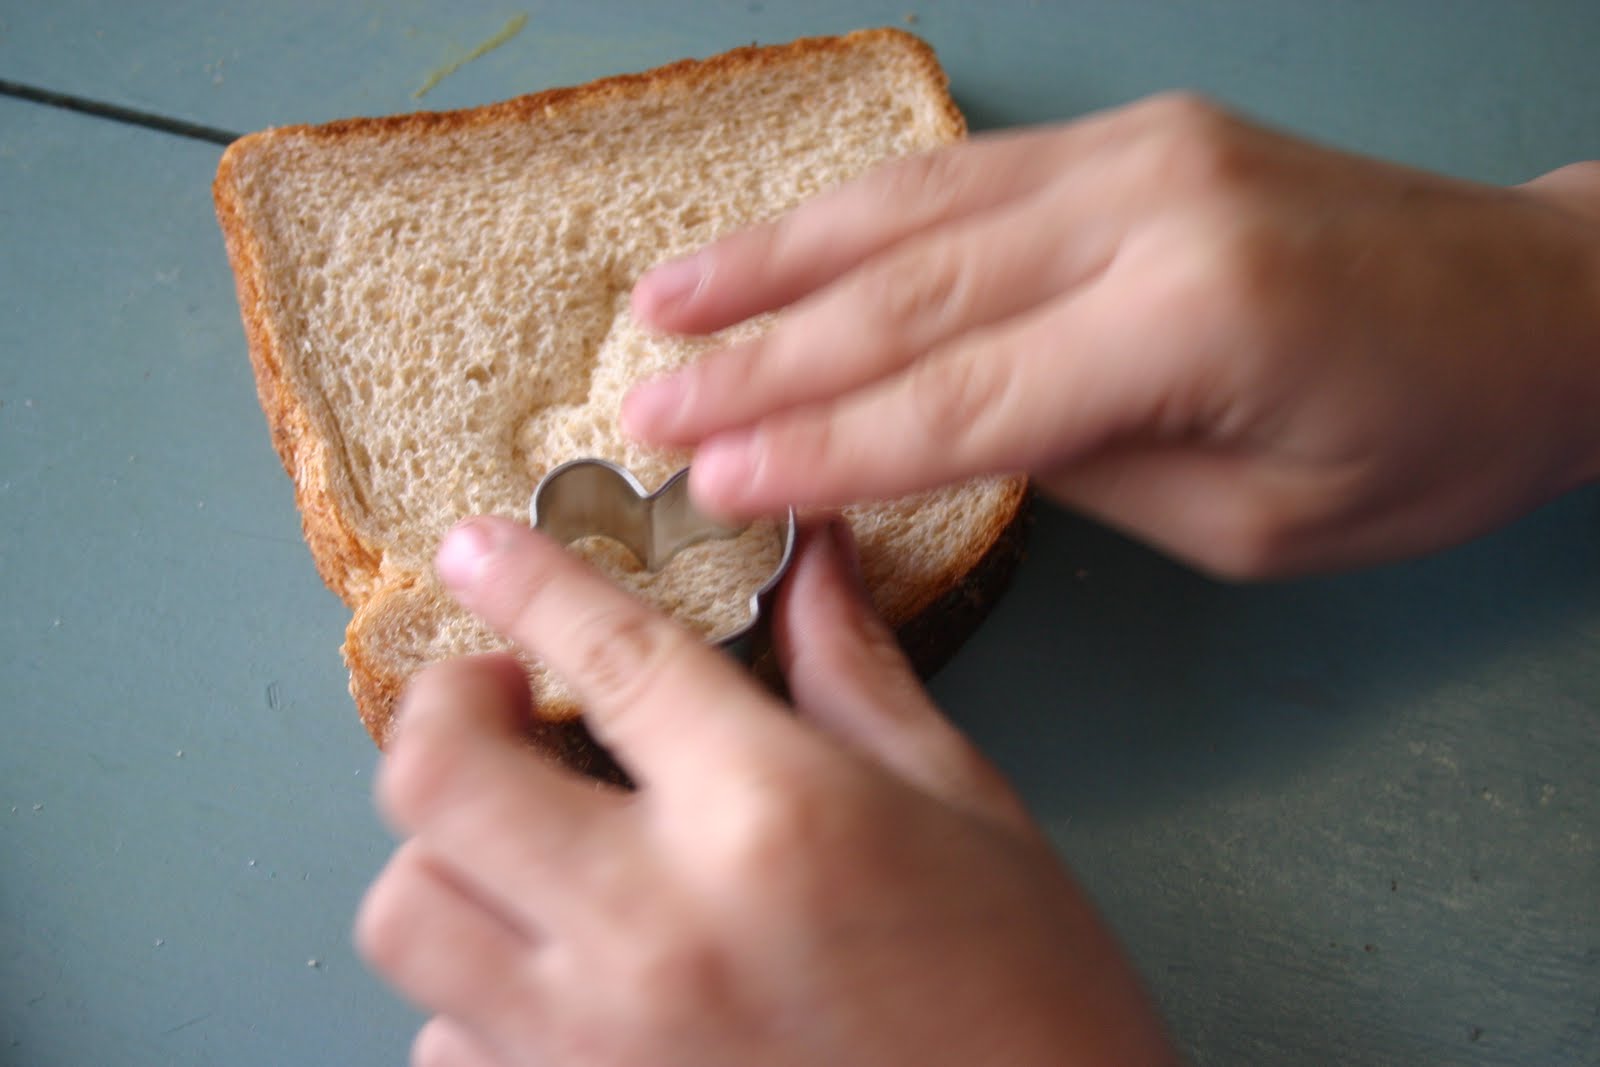
I had left out some mini-Easter cookie cutters. You see, I tried making Rice Krispie balls with peanut butter filing covered in chocolate. I tried it too with nutella. Neither worked so well. They fell apart and did not stay on their stick. Needless to say, I failed and will have to attempt to make them again after some adjustments so I can show you. But they did taste good! So, I had the cookie cutters out and I showed the kids how to have cute little crackers and cheese! Fun times!

Okay, that was a really long explanation. Now you get "crackin" and "cut some cheese!" Har, har.


Print Friendly and PDF

Friday, February 25, 2011

Herbed Salmon and Zesty Brown Rice


Ready for a super simple yet delicious salmon recipe? You're in luck! This is one of my favorites! The flavors are subtle enough for kids. Even my husband, who generally doesn't like brown rice , loved this brown rice recipe.

Honey Mustard Basil Salmon & Zesty Brown Rice Salad

2 Large or 4 small Salmon fillets, about 1" thick
2 Tbsp olive oil
2 Tbsp lemon juice
1 Tbsp honey dijon mustard (or 1 Tbsp dijon mustard mixed with 1 tsp honey)
2 garlic cloves, minced
1/4 cup basil, freshly chopped
salt and pepper to taste

Remove any bones with pliers. Place salmon, skin side down, on a cookie sheet. In a small bowl, mix together olive oil, lemon juice, mustard, and garlic. Stir in chopped basil. Season with salt and pepper. Spread mixture over fillets with pastry brush or simply spoon it over and smooth it over until the whole fillet is covered. Let sit and marinate while you prepare the brown rice. If you make ahead of time cover this dish and keep in the fridge.

Pre-heat oven to 375 degrees. Bake for for about 12 minutes or until the fish flakes when scraped with a fork, or thermometer reads 140 degrees.

**TIP: Do NOT overcook. The general rule for fish is 10 minutes per one inch thick fish. So if the fillet is only 1" thick cook for about 10 minutes. If it's 2 inches then cook for about 20 minutes.

**TIP: Did you know you rarely need to skin salmon or halibut? Most of the time we place the fish directly over foil on a cookie sheet, flesh side up, and bake. When it's perfectly cooked, it should "peel" right off the skin that sticks to the foil. Easy clean up and no skin!

Zesty Black Bean and Brown Rice Salad

Shared with me by my friend Mareen
Yield: A lot! 6-7 cups, serves about 10

Combine the following in a large bowl:
6 C brown rice, cooked and cooled
2 15 oz cans black beans, drained and rinsed
2 C corn, fresh, frozen, or canned (drained)
1 C celery, sliced
3/4 C green onion, chopped
2 C tomatoes, chopped
1 bell pepper, red or green, chopped
1/4 C cilantro, chopped

Dressing:
Whisk together the following:
1/4 C red wine vinegar
1/2 C olive oil
2 tsp tabasco sauce
1/2 tsp ground cumin
1 tsp salt (or to taste)
1/2 tsp black pepper
4 Tbsp white sugar (or as desired, to taste)

Pour over rice mixture and combine. It can be served warm or chilled. I think it tastes better chilled.

Enjoy! Print Friendly and PDF

Wednesday, February 23, 2011

Carnival Inspiration board

Isn't this cake so clever? From a distance they look like old fashioned balloons. Perfect!
Source

I am throwing my nephew and two nieces a birthday party in April. I thought that a circus/carnival theme would be perfect for our large family and for both boys and girls! I call it "April's Fools."

My mind has been whirling with ideas since January. Can't....stop.....thinking......about.....it.

Here are two inspiration boards. I can't decide on the color palette yet. Traditional red, yellow, blue? Hot pink, teal, grass green and pale yellow? Vintage? I'm thinking rainbow....that way I can use all of them!


There are many more detailed photos so I've shared the source info if you'd like to reference them yourself! So much talent out there!

And by the end of April you'll get to see how it all turned out! I am so excited for this one! It's going to be so fun!

Also, if you'd like to enter a contest over at Kara's Party ideas for this very theme you could possibly win $150 worth of carnival party stuff! What perfect timing! I'm all about winning stuff! If you'd like to enter go here.


Inspiration Source Info:
1. Harp clips and striped food labels plus sprinkle marshmallow pops! A little polkadot
2. Animal crackers, Blow out party
3. Vellum mobile streamers, Project Wedding
4. Pink and yellow candy jar labels, here
5. Mustache photo booth, Ohdeedoh
6. Striped pink envelopes and invitation, here
7. Ticket holder, kara's party ideas
8. Zig Zag rainbow tablecloth, Crate and Barrel
9. Candy prize jars and scoops, Aesthetic Nest
10. Rainbow cake, Whisk Kid
11. Lollipops and bubblegum centerpieces, tomkat studios
12. Darling vintage yellow and pink, source
13. Jars full of treats and prizes, here
14. Gable boxes adorned with pennant bunting, A little polkadot
15. Rainbow oreos, Buggie & Jellybean from tomkat studios
16. Vintage stamps, One Charming party
Pink and yellow candy jar labels, here


Inspiration to take part in "Celebrate the Boy" month over at Made and Made by Rae. What can you make for your little guys next birthday party? Print Friendly and PDF

Tuesday, February 22, 2011

Girl's bedroom

This week is the big move. We are moving older sister out of brother's room and moving her into younger sister's bedroom. They've been anxiously awaiting this change. I've been anticipating decorating their new rooms once they're all arranged. But I am in angst.

I have a very clear vision of brother's room. Think "little explorer." It's a combination of both of our interests in traveling, fish, water and adventuring.

For the girls room I wanted it to be a bit more eclectic. Charming, whimsical, vintage combined with new, birds and girly with pink and blue florals.

However, as I went "shopping" in my mom's craft room and found yards and yards of this peach floral fabric that was almost used in my teenage bedroom. But my mom was never able to use it because I had changed my mind and wanted something more "modern." But this fabric could have so many uses! And it's free!

But here is my dilemma. I don't LOVE this peachy fabric. But I don't LOVE this duvet cover I bought for J at Ikea last fall when we thought J and S would share a room for a few more years. And finally, I have remnants of these other fabrics as well. So I know with eclectic bedrooms you can mix and match patterns and colors. But what about tones? And completely different shades of colors that are not in the same family?

Here are two rooms that I am drawing inspiration from:


Lori Danelle's girls' bedroom:


I love the first one because of the use of golds, oranges, pinks, vintage and new, handmade and not. It's all in there yet if flows nicely.

I love the second because of the teal dresser, the mismatched bunting, and the variety of bright colors!

So this is what I have:
The Ikea bedspread:


Peach, practically vintage, yardage:


The colors that I really like and already own:

Everything together:

So, I'm not so sure if the above colors go well enough together. I wouldn't mind making a duvet cover with the peach fabric. Or curtains. But I don't think I can combine the above colors with the raspberry pink Ikea duvet. So, what do you think? Do you think the peach is too "faded" or pastel to match with the more bold and bright colors that I already have? And how much would the craziness be if I did throw in the Ikea duvet? I think I can get away with it but I'm scared it'll look like a big blob of ugliness too!

Decisions, decisions....this is why I can't get anything done. My mind is constantly dreaming and deciding and envisioning.....is it like that for you too? Print Friendly and PDF

Friday, February 18, 2011

Dinosaur Dig

J wanted to do something special today. Was I surprised?

I am still recovering from our huge Church activity that I was in charge of last night. It turned out so beautifully and I'll share more on that once I get the photos from my friends awesome camera (because, of course, I forgot mine).

So this is what I wore today until about....well, now. C is down for nap #2 so I'll finally be able to get ready for the day.


So I thought of something spur of the moment and inspired by one of my favorite blogs One Charming Party. Sometimes those spur of the moment ideas are the best, aren't they?

You just need a few materials and you can make your own child sized table-top dinosaur dig!

I grabbed a tray and filled it with some candy (fossils), cut up snickers look like really dino parts and mentos make great looking eggs:


Sugar and a brush (basting or painting). I used about 2 cups per cake pan sized tray:

Binoculars and Aprons:

A map:


And pried my son off Angry Birds and we were on an adventure!

It helps to speak in a cool explorer accent like Spanish (think Columbus) or Australian (think Crocodile Dundee....side note-when I was staying up late creating pom-poms for C's Caterpillar birthday party I watched both films back to back! It was so nostalgic!). Since I am not so hot at the Spanish thing I tried the Australian. S asked me to stop it because he thought it was "weird" but liked it after about 3 lines. Plus it's always fun for me to practice dialects that have been collecting dust in the back of my brain from my acting days.

So we went on our adventure looking for fossils around the house. We checked high and low until J spotted them (okay, she knew where I set it up) with her binoc's. After the initial shock, of, "cool, what is this?", they got to work!


This activity lasted at least 20 minutes after I left them. It makes a bit of a mess (and a tasty one) but it's totally worth it!

J cleaned all the dino's, reptiles and other creatures that belong in that basket. I like how she arranged them all over the sink to dry.


How would you arrange your dinosaur dig?
Print Friendly and PDF

Saturday, February 12, 2011

Oreo's--Valentine's Dessert 4


Homemade Oreo's
Makes about 18 sandwich cookies


Making this recipe is so basic and simple but can easily be dressed up for any holiday or occasion! Plus, it's a great activity to do with your children! There are many recipes floating around the blogosphere. But I chose the simplest version with the cake mix from Tangled and True because I am lazy and cake mix was on sale! I adapted it a bit. But they were a bit greasy so next time I think I'll try the non-cake mix version (she has both on her blog).

Cake Mix Cookie version
1 package devil's food cake mix - Chocolate or German Chocolate (If you are going to use the German chocolate mix be sure to press cookies to slightly flatten then immediately after removing them from the oven - this will insure a perfectly round cookie)
2 eggs
1/2 cup oil (or butter flavored shortening)

Cream filling (enough filling with plenty to spare)
1 stick butter
1 package of cream cheese (8 ounces)
3-4 cups confectioner's sugar (depending on desired consistency)
1 tsp vanilla extract
Food coloring or food gel, optional

Cream butter (about 2 mins). Add cream cheese and mix well. Add confectioner's sugar slowly until you reach your desired consistency. Add vanilla and food coloring, if using. Mix.

Directions:
Pre-Heat oven to 350 degrees.

Mix ingredients with hand mixer until comes to a thick consistency. Now, this is a fun part for your kids to help with, Roll dough into balls (about the size of a ping pong ball, try different sizes for different cutters. I used golf ball sized balls for bigger cutter). Place on lightly greased cookie sheet. Bake for 8-9 minutes. Remove from oven and let cool on sheet (until warm). Remove cookies from sheet and place on cooling rack.

Can you believe I am showing you into my messy kitchen especially with bad lighting? Shock! Well, I am because I am a visual person and like to see some helpful tips :)
If you want shaped cookies then cut them out now. Cut (and eat the scraps as you go along :) ) with cookie cutter and flip over so pretty side is face down. To assemble the cookies, use a pastry bag with any tip you've got (you can always use a zip lock bag with a round tip or just use a butter knife) add about a tablespoon of filling into the center of one cookie. Place the opposite cookie or for rounds one that is similar in size on top of the filling, the nice looking side up, of course. Lightly press, to work the filling evenly to the outsides of the cookie. Continue this process until all the cookies have been sandwiched with cream. Now, if you'd like, roll the cookies gently in a bowl of sprinkles of your choice. Refrigerate. Store cookies in fridge because of the frosting plus they taste better and have a nicer firm look.

And then I went a little crazy with the wonderful lighting...


Print Friendly and PDF

Friday, February 11, 2011

Creme Brulee--Valentine's Dessert 3

Photo compliments to my friend Melissa E
Dessert compliments to my hubby, except the garnish and burning, I did that :)

Classic Crème Brûlée

The French have perfected the art of making desserts. In all their styles of cooking they try to achieve perfection. The best way to achieve this? Contrast. Opposites. This recipe is a prime example of this juxtaposition they love to create. Though the English first "invented" this desset the French came to call it Crème Brûlée, or "cholesterol bombs" as Bo Friberg calls them. Crème Brûlée literally means burnt cream. The cream (creme) is thick, smooth, creamy and chilled. The sugar is "burnt" (brulee), crisp, thin and warm. To eat this dessert you must gently tap on the burnt sugar. You know it's made well if it's not too thick and not soggy! You gently tap on the sugar, break through this "shell" and you are immersed in the creamy luscious cream. You take a bite and you discover the sensation of the crisp bitter sugar and then the smooth sweet vanilla cream. Perfection!

Classic
Crème Brûlée
adapted from two recipes by Cooks Illustrated and Bo Friberg's The Professional Pastry Chef.

Serves 8-10, ramekins like pictured above

1 vanilla bean
2/3 cup granulated sugar
pinch table salt
4 cups heavy cream
12 large egg yolks
1 tsp vanilla extract
extra granulated or turbinado sugar for the burning

1. Adjust oven rack to middle position. Pre-heat oven to 300 degrees.

2. Cut the vanilla bean in half lengthwise and scrape out the seeds. Save the pods for later. Combine the seeds with the sugar, rubbing the sugar mixture lightly with your fingertips to combine. Set aside.

3. Combine 2 cups of the cream, sugar and salt in medium saucepan. Submerge bean pods into mixture and heat just until scalding point over medium heat, stirring occasionally to ensure the sugar dissolves. Take pan off heat and let steep 15 minutes to infuse flavors.

4. Meanwhile, place a rag dish towel (one that normally would use to cover your bread while rising, for example) in bottom of a cookie sheet. Bring a small pan of water to boil. We can fit 8 on our cookie sheet as pictured.

5. After the cream has steeped, remove bean pods and stir in remaining 2 cups cream to cool down mixture. Whisk yolks in large bowl until broken up and combined. Whisk about 1 cup cream mixture into yolks until loosened and combined; Do not whip! repeat with another cup of cream. Add remaining cream and whisk until evenly colored and thoroughly combined. Strain through fine-mesh strainer into 2-quart measuring cup or pitcher (or clean medium bowl); discard solids in strainer. Pour or ladle mixture into ramekins, dividing it evenly. Reserve any extra cream for another baking batch.

6. Carefully place cookie sheet in pre-heated oven. Pour boiling water into pan, without splashing or pouring any water into the empty ramekins. Fill cookie sheet until water reaches 2/3 or 3/4 the way up the ramekin (depending on how deep your dish is). With the oven rack slightly slid out a bit, with the cookie sheet resting on the shelf but not on the edge, do this so the pan does not tip and spill and so you have room to pour into ramekins without burning your hand on the top broiler while trying to pour the custard. Pour the custard into each ramekin. Be sure to fill the ramekins all the way to the top as the custard will settle slightly while cooking. Gently slide oven rack into place and bake.

7. Bake until custard is just barely set and no longer sloshy, between 170 and 175 degrees internally. About 30-35 minutes (25-30 minutes for shallow fluted dishes, like we use). Do NOT overcook as the custard may break and have an unpleasant texture. Do not underbake either as you don't want to serve raw custard.

8. Remove the ramekins from the water bath and transfer to a cooling rack. Cool to room temperature, about 2 hours, and refrigerate until completely chilled.

9. The custards can be stored in the refrigerator for 4-5 days at this point, left in their ramekins, covered tightly with saran wrap. Do NOT store with burnt sugar, it will dissolve and taste very gross and get soggy. Believe me, we've tried this.

10. Presentation. If condensation has collected on custards, place a paper towel on surface to soak up moisture. Sprinkle just enough granulated or turbinado sugar on top of the custard to cover the surface. Clean off any sugar on the edge or outside of the ramekin. Tilt and tap the sugar to cover surface evenly. Caramelize the sugar with a blow torch (purchased at hardware store) or mini torch (purchased at home goods/kitchen appliance store). If you do not have a torch you can place the ramekin directly under a broiler. Burn until dark golden brown, almost black. Until the shell is completely firm and not jellied.

11. Decorate with fresh fruit or enjoy plain! Good luck eating a whole one by yourself! Now you'll never want to buy one for $8 from a restaurant again! It probably won't taste as good as your homemade version anyhow!


Print Friendly and PDF

Thursday, February 10, 2011

Fortune Cookies--Valentine's Dessert 2


Decorated Fortune Cookies


You can either buy your own and create your own sayings and slip them in then decorate. OR you can make your own! I found this idea on Our Best Bites (LOVE that blog). I decided to try my hand at these to give away as gifts to some gals I visit. They are a bit tricky to work but if you follow their directions, I think they turn out pretty good! I used almond extract like they suggested because I love it! When my kids walked into the kitchen as I finished making the batter they asked, "what is that yummy smell?" That, my dear children, is almond. LOVE it!

Be sure to check out the original post to find more helpful tips! I think I made mine a bit too thick because it only yielded about 18 cookies instead of 24.

Homemade Fortune Cookies
adapted from Cooking Light

1/2 C flour- If you have bread flour, use it.
1/2 C sugar
1 tsp vanilla- or sometimes I use 1/2 almond 1/2 vanilla
2 egg whites

Place all ingredients in a food processor and blend to combine. Place in a container and chill 1 hour.

Preheat oven to 400°.

Cover a baking sheet with parchment paper*. Draw 3-4 (3-inch) circles on paper. Turn paper over. Spoon 1 teaspoon batter into center of each of the drawn circles; spread evenly to fill circle. Bake at 400° for 5-6 minutes or until the cookies are brown just around the edges and a little toward the centers. Remove from the oven. Let sit for a few seconds before removing from pan. Working quickly, loosen edges of cookies with a spatula, and turn over.

*Make sure to note the 3 baking methods described in the post above. You might find that one of those works better for you.

Place fortune along the center of 1 cookie. Fold cookie over so the edges meet ; press edges together. Gently pull the ends of the cookie down over the rim of a small bowl (or jar); hold for a few seconds or until set. Repeat procedure with remaining cookies. Makes about 24 cookies.


Print Friendly and PDF

Wednesday, February 9, 2011

Strawberry Tart--Valentine's Dessert 1


Fresh Strawberry Tart

If you are lucky and find fresh and tasty strawberries at this time of year then make this beautiful strawberry tart for your sweetheart! This was one of our favorite treats when we visited the patisseries in Paris. My husband learned how to make one while we lived in Paris from a friend of ours who was studying culinary arts there. Though I made this one pictured, my hubby really perfected the recipe! Believe me, he's made many versions and this is the one we've found works the best. The sweet thick crust combined with the silky cream topped with firm ripe fruit! Perfection!

It's not exactly the easiest recipe but it's worth it!

Pastry: from Cooks Illustrated
Makes one 9- to 9 1/2-inch tart shell
If the dough feels too firm when you’re ready to roll it out, let it stand at room temperature for a few minutes. If, on the other hand, the dough becomes soft and sticky while rolling, don’t hesitate to rechill it until it becomes easier to work with. Better to rechill than to add too much flour, which will damage the delicate, crisp texture of the dough. We find a French rolling pin (as pictured in illustrations) to be the most precise instrument for rolling tart pastry. Bake the tart shell in a 9- to 9 ½-inch tart pan with a removable bottom and fluted sides about 1 to 1 1/8 inches high. This recipe is formally known as Pâte Sucrée.

Ingredients

1 large egg yolk
1 tablespoon heavy cream
1/2 teaspoon vanilla extract
1 1/4 cups flour
2/3 cup confectioners' sugar
1/4 teaspoon
8 tablespoons unsalted butter (1 stick, very cold), cut into twenty-four 3/4-inch cubes
1 tablespoon flour for dusting

Instructions

  1. 1. Whisk together yolk, cream, and vanilla in small bowl; set aside. Pulse to combine 1 1/4 cups flour, sugar, and salt in bowl of food processor fitted with steel blade. Scatter butter pieces over flour mixture; pulse to cut butter into flour until mixture resembles coarse meal, about fifteen 1-second pulses. With machine running, add egg mixture and process until dough just comes together, about 25 seconds. Turn dough onto sheet of plastic wrap and press into 6-inch disk. Wrap in plastic and refrigerate at least 2 hours.
  2. 2. Unwrap dough; lightly flour large sheet of parchment paper or plastic wrap and place dough in center. Following illustrations 1-9, roll out dough and line tart pan. Freeze dough 30 minutes.
  3. 3. Meanwhile, adjust one oven rack to upper-middle position and other rack to lower-middle position; heat oven to 375 degrees. Place chilled tart shell on cookie sheet; press 12-inch square of foil inside tart shell and fill with metal or ceramic pie weights. Bake on lower rack 30 minutes, rotating halfway through baking time. Carefully remove foil and weights by gathering edges of foil and pulling up and out. Transfer cookie sheet with tart shell to upper rack and continue to bake until shell is golden brown, about 5 minutes longer.

Step-by-Step

Rolling and Fitting the Dough
  • 1. To facilitate rolling, flatten the dough with a rolling pin by rapping it smartly with one hand and spinning the dough with the other.
  • 2. Roll the dough upward from the center and downward from the center with even pressure.
  • 3. Spin the dough one quarter turn, repeating step 2 until dough is 13 inches in diameter (15 inches for an 11-inch tart pan) and 1/8 inch thick. Loosen the dough from the plastic and flour again.
  • 4. Ease the dough over the rolling pin and roll it up loosely. Unroll the dough on top of the tart pan.
  • 5. Lift the edge of the dough with one hand and ease it into the corners of the pan with the other.
  • 6. Press the dough into the fluted sides of the pan, forming a distinct seam along the pan circumference.
  • 7. If some edges are too thin, reinforce the sides by folding the dough back on itself.
  • 8. Run the rolling pin over the top of the tart pan to remove any excess dough.
  • 9. The finished edge should be 1⁄4 inch thick. If it is not, press the dough up over the edge and pinch.

Pastry Cream from Bo Friberg's Professional Pastry Chef.
1 pint (480 ml) whole milk
½ vanilla bean (½ tsp. vanilla extract)
1.5 oz. (30g) corn starch
4 oz. (115g) sugar
¼ tsp. (1g) salt
2 eggs
2 oz. (55g) unsalted butter
Directions:
  1. Place the milk in heavy bottom saucepan.
  2. If using the vanilla beans, split lengthwise and scrape out seeds.
  3. Add seeds and pod halves to milk and bring to boil.
  4. Keeping eye on milk, whisk corn starch, sugar and salt in bowl.
  5. Gradually add eggs, and mix until smooth.
  6. Slowly add 1/3 of hot milk to egg mixture while whisking rapidly.
  7. Pour tempered egg mixture back into remaining milk.
  8. Place over medium heat, and cook stirring constantly until mixture comes to boil and thickens.
  9. Boil for a few seconds longer to make sure the raw starch taste has disappeared.
  10. Remove vanilla bean, rinse and save for another use.
  11. Stir in vanilla extract (if using) and butter until incorporated.
  12. Pour custard into bowl and cover with baking paper.
  13. When cooled, store in refrigerator.

Finally, top with your choice of fresh seasonal fruit. We prefer strawberries (about a pound or maybe 2?). Use clean and dried fruit. I recommend washing and letting air dry before you start the actual recipe. Dust with powdered sugar or make a glaze with strawberry jelly and water. Mix and heat for a little bit until it become spreadable. Drizzle or paint over the fruit. Beautiful, isn't it?


No, that's not me modeling. It's my lovely sister! Print Friendly and PDF